Quick Navigation
- 1Examine the Data
- 2What are Helper Columns?
- 3Adding Helper Columns for Week-To-Date
- 4Calculating Week-To-Date using SUMIFS
- 5Adding Helper Columns for Month-To-Date
- 6Calculating Month-To-Date using SUMIFS
- 7Adding a Helper Column for Year-To-Date
- 8Calculating Year-To-Date using SUMIFS
- 9 Aggregate Statistics X-To-Date Example
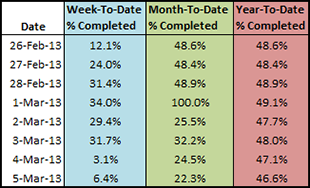 When you are working with date-stamped data imports, the volume of information can be overwhelming. It is difficult to tell, at a glance, whether performance indicators are trending upwards, downwards, speeding up, or slowing down. Aggregate statistics like Week-To-Date, Month-To-Date, and Year-To-Date performance data can often be easier to read and tell you more about what’s actually going on. Let’s learn how to implement X-To-Date aggregate statistics using helper columns, Excel date functions, and SUMIFS.
Examine the Data
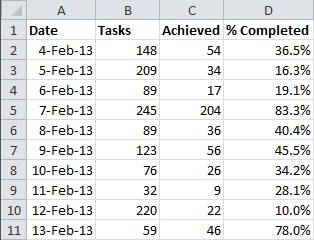
We seem to be looking at a basic date series. There’s a row for each day with a date stamp, a list of tasks available and tasks completed. We already have a % Completed column that is re-calculated for each day.
What are Helper Columns?
We are going to add Week-To-Date, Month-To-Date, and Year-To-Date columns to this spreadsheet. To make the process simpler and make the formulas easier to understand, we’re going to use a number of helper columns to spread out the work and simplify the logic involved.
A helper column is a column that calculates a number for use in other formula cells. It’s called a “helper” column, because while it helps get the result you need in the final column, it’s usually not useful by itself. When we are done with this exercise, we are going to hide the helper columns to make the spreadsheet easier for other people to read.
Adding Helper Columns for Week-To-Date
How does a Week-To-Date calculation work? It starts at the beginning of the week and adds up all the rows that occur in the same week of the same year, up until the current day. In order to calculate a Week-To-Date column, we need to be able to compare the week that each row occurs in and the day of the week for each row. We’ll also check to make sure the dates appear in the same year. Fortunately, Excel has functions for just those purposes. WEEKDAY() calculates the day of the week. WEEKNUM() calculates how many weeks the date is into the current year. YEAR() calculates the year of the date. The syntax for these functions is as follows:
=WEEKDAY(serial_number, [return_type])
=WEEKNUM(serial_number, [return_type])
=YEAR(serial_number)
The serial_number is the way that Excel stores the date. You can specify any cell formatted like a date.
The [return_type] lets you tell Excel when your week begins. 0 (zero) is a standard Sunday – Saturday week. 1 is Monday – Sunday. 2 is Tuesday – Monday, etc.
In cell E2 create a formula to calculate the weekday of the date in A2. We’re going to start our weeks on Monday. The formula will look like this:
=WEEKDAY(A2,2)
In cell F2 create a formula that calculates the week number of the date in A2. Again, the week will start on Monday. That formula will look like this:
=WEEKNUM(A2,2)
Finally, we’ll calculate the year of the date in cell G2. The formula will look like this:
=YEAR(A2)
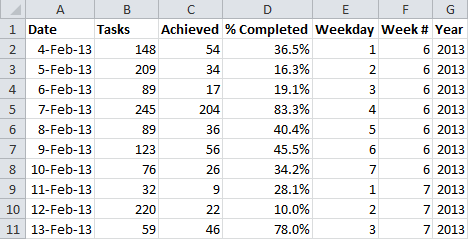
Drag down the formulas to populate the rest of the cells in columns E:G. The output should resemble this:
Calculating Week-To-Date using SUMIFS
Now that we have the helper columns in place, we can assemble a SUMIFS function to add up the tasks achieved for each week. The syntax for SUMIFS is as follows:
=SUMIFS(sum_range, criteria_range1, criteria1, ...)
The sum_range field is the set of cells you want SUMIFS to add together if they meet the criteria.
The critera_range1 field is the set of cells you want to test your first IF statement against.
The criteria1 field is the conditional statement you want to test the criteria_range1 against.
SUMIFS can take as many sets of criteria_range and criteria as necessary. The sum_range will be column C.
To sum the tasks achieved each week, we’ll need three sets of criteria tests – one for each of the helper columns we just built.
The first criteria_range will be column E. To see if the weekday is equal to or less than the current row, we need to set the criteria to be the WEEKDAY of the date in cell A2.
The second criteria_range will be column F. To see if the week # matches the current row, we need to set the criteria to be the WEEKNUM of the date in cell A2.
The third criteria_range will be column G. To see if the year matches the current row, we need to set the criteria to be the YEAR of the date in cell A2.
The final SUMIFS statement will look like this:
=SUMIFS(C:C,E:E,"<="&WEEKDAY(A2,2),F:F,WEEKNUM(A2,2),G:G,YEAR(A2))
That takes care of the tally of the Achieved Tasks, but we still need to calculate the number of total Tasks for each calculation. Fortunately, we don’t need to do all this work all over again. Select the SUMIFS statement we just created and copy everything but the equal sign at the beginning. The only thing we will be changing is the sum_range. The SUMIFS formula for the second half of the calculation will look like this:
=SUMIFS(B:B,E:E,"<="&WEEKDAY(A2,2),F:F,WEEKNUM(A2,2),G:G,YEAR(A2))
We need to combine the statements, dividing the total Achieved Tasks by the total Tasks to get the ratio we need for the percentage. The final formula in cell H2 is as follows:
=SUMIFS(C:C,E:E,"<="&WEEKDAY(A2,2),F:F,WEEKNUM(A2,2),G:G,YEAR(A2))/
 SUMIFS(B:B,E:E,"<="&WEEKDAY(A2,2),F:F,WEEKNUM(A2,2),G:G,YEAR(A2))
Drag down the formula to populate the rest of the cells in column H. The output should look like this:
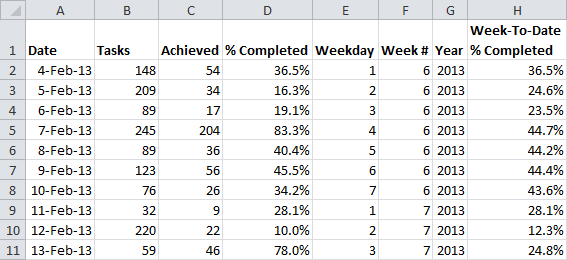
Now, we’re done with the first 2 helper columns, so we can hide them. Select the labels for columns E and F. Right click the selection and choose Hide.
Adding Helper Columns for Month-To-Date
The process for building helper columns for the Month-To-Date column is very similar to the Week-To-Date process.
Month-To-Date starts at the beginning of the month and adds up all the rows that occur in the same month of the same year, up until the current day. In order to calculate a Month-To-Date column, we need to be able to compare the month that each row occurs in and the day of the month for each row. We’ll also check to make sure the dates appear in the same year. The Excel function MONTH() calculates the month of the date. DAY() calculates the day of the month. We’ll use the same column of YEAR calculations in column G. The syntax for the new functions is very straightforward:
=MONTH(serial_number)
=DAY(serial_number)
The serial_number (as before) is the way that Excel stores the date. You can specify any cell formatted like a date.
In cell I2 create a formula to calculate the month of the date in A2. The formula will look like this:
=MONTH(A2)
In cell J2 create a formula that calculates the week number of the date in A2. That formula will look like this:
=DAY(A2)
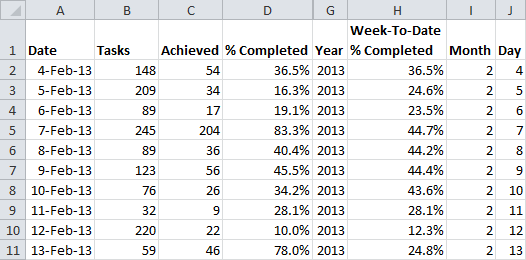
Drag down the formulas to populate the rest of the cells in columns I:J. The output will look like this:
Calculating Month-To-Date using SUMIFS
Now that we have the helper columns in place, we can assemble a SUMIFS function to add up the tasks achieved for each month. The process is the same as for Week-To-Date.
The first criteria_range will be column I. To see if the month is equal to the current row, we need to set the criteria to be the MONTH of the date in cell A2.
The second criteria_range will be column J. To see if the day is equal to or less than the current row, we need to set the criteria to be the DAY of the date in cell A2.
The third criteria_range will be column G. To see if the year matches the current row, we need to set the criteria to be the YEAR of the date in cell A2.
The first SUMIFS statement will look like this:
=SUMIFS(C:C,I:I,MONTH(A2),J:J,"<="&DAY(A2),G:G,YEAR(A2))
We’ll do the same trick to shift the sum_range for the second SUMIFS function. The second SUMIFS statement will look like this:
=SUMIFS(B:B,I:I,MONTH(A2),J:J,"<="&DAY(A2),G:G,YEAR(A2))
We need to combine the statements, dividing the total Achieved Tasks by the total Tasks to get the ratio we need for the percentage. The final formula in cell K2 is as follows:
=SUMIFS(C:C,I:I,MONTH(A2),J:J,"<="&DAY(A2),G:G,YEAR(A2))/
 SUMIFS(B:B,I:I,MONTH(A2),J:J,"<="&DAY(A2),G:G,YEAR(A2))
Drag down the formula to populate the rest of the cells in column K.
Now, we’re done with the Month and Day helper columns, so we can hide them. Select the labels for columns I and J. Right click the selection and choose Hide.
Adding a Helper Column for Year-To-Date
We have one more helper column to build for Year-To-Date
Year-To-Date starts at the beginning of the year and adds up all the rows that occur in the same year, up until the current day. In order to calculate a Year-To-Date column, we need to be able to compare the year that each row occurs in and the day of the year for each row. The Excel function YEARFRAC() calculates the percentage of the year that has passed since a starting date. DATE() calculates the day in Excel format, given the month, day, and year. We’ll use it to help calculate the year fraction. We’ll use the same column of YEAR calculations in column G. The syntax for the new functions is as follows:
=YEARFRAC(start_date, end_date, [basis])
=DATE(year, month, day)
The start_date defines the beginning of your year – your year can start arbitrarily and doesn’t need to begin January 1st.
The end_date is the end of the period you wish to calculate as a fraction of a year.
The [basis] lets us define the “year” in a few different ways. 1 will give us the actual year.
The DATE function takes a numerical year, a numerical month between 1-12, and a day between 1-31.
In cell L2 create a formula to calculate the fraction of the year that has passed as of the date in A2. The formula will look like this:
=YEARFRAC(DATE(G2,1,1),A2,1)
We’re telling YEARFRAC to start the year at January 1, of the year in cell G2, and tell us how far along in the year cell A2 is.
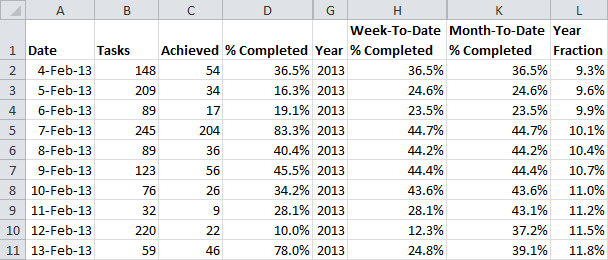
Drag down the formula to populate the rest of the cells in column L. The output will look like this:
Calculating Year-To-Date using SUMIFS
We only need 2 criteria for the Year-To-Date calculation.
The first criteria_range will be column G. To see if the year is equal to the current row, we need to set the criteria to be the YEAR of the date in cell A2.
The second criteria_range will be column L. To see if the fraction of the year is equal to or less than the current row, we need to set the criteria to be the Year Fraction of the date in cell A2.
The first SUMIFS statement will look like this:
=SUMIFS(C:C,G:G,YEAR(A2),L:L,"<="&L2)
We’ll do the same trick to shift the sum_range for the second SUMIFS function. The second SUMIFS statement will look like this:
=SUMIFS(B:B,G:G,YEAR(A2),L:L,"<="&L2)
We need to combine the statements, dividing the total Achieved Tasks by the total Tasks to get the ratio we need for the percentage. The final formula in cell M2 is as follows:
=SUMIFS(C:C,G:G,YEAR(A2),L:L,"<="&L2)/SUMIFS(B:B,G:G,YEAR(A2),L:L,"<="&L2)
Drag down the formula to populate the rest of the cells in column M.
Now, we’re done with the rest of the helper columns, so we can hide them. Select the labels for columns G and L. Right click the selection and choose Hide.
Aggregate Statistics X-To-Date Example
You can play around with the example before the data was aggregated on the first worksheet and after on the second sheet. You can also download the sample file by clicking the Excel icon in the bottom right.
I’m putting this in L2 but my result ends up =0.
Is there an error?
=SUMIFS(C:C,G:G,YEAR(A2),L:L,”<="&L2/SUMIFS(B:B,G:G,YEAR(A2),L:L,"<="&L2))
How would you need to adjust these comments for a business that operates only 5 days a week (Monday-Friday)?
Thank you-
Formulas, not comments.
I have spreadsheets for each week of the month. I need to put the the totals on a month end sheet and then create a year to date sheet. how do I do that
The MTD values are not coming in %